Monday, April 29, 2013

Convection Currents

5th Graders studied and created convection currents today.

Convection currents occur when there are differences in density.  Most of the time this is caused by heat changing the density of a substance. 


When a substance gets hot, the molecules start moving faster and spread out.  The substance becomes less dense and rises.  When it rises away from the heat, it cools.  Then it falls back down where it is heated once again.  This is an example of a convection current.

Convection currents occur everywhere!  In the air (sea and land breezes are perfect examples), in the earth's crust (that is what makes plates move), and in the ocean when warm water or less salty water rises.

Before creating our convection current, we were reminded about density while making a puddle out of different temperatures of water.

First we poured in our yellow room temperature water.


Not really that exciting.

Next, we poured blue cold water in!   We remembered that cold water is more dense than room temperature water, so we predicted it would sink to the bottom. 

It looked a lot like the cold front we created only different colors!

Lastly, we poured our red, hot water down.  Remembering that hot water is less dense, we predicted it would be on top.


It was!

After cleaning up our rainbow puddle, it was time to put our knowledge to the test.  We started with a tub full of room temperature water.  We took a few drops food coloring and put it on the bottom of the tub.  Then we created a hot spot underneath the food coloring. 


VoilĂ , a convection current!  The hot water heated the spot with the food coloring, causing the water to rise (and the food coloring).  When water hit the top it moved to the sides, cooled and came back down. 

Check out these videos. 

This first one is from Eureka!  They have some great science videos for your curious brain!

This one is from Glaskar and Mega Systems and explains how convection currents work inside the earth to move plates.


Monday, April 22, 2013

Changing Salt Water into Fresh Water

Today 5th Graders used their knowledge of the water cycle to create a device that changes salt water into fresh water.

Most of the earth's water is trapped in the ocean.  It is not useable for drinking.  In fact if all the water in the world was modeled by a two liter bottle (2000 mL), 1950 mL would be salt water!

Only 50 mL would be fresh.  This fresh water includes unreachable ground water, lakes, rivers, and streams, as well as glaciers and ice caps.


Taking away all of the unreachable water (in the ice caps and deep underground or trapped in porous rocks) only .5mL of our model would be drinkable water!  Amazing we don't die of thirst!

Today students worked in groups to design a way to turn salt water into fresh water using their knowledge of some very important water cycle words!


Evaporation:  When liquid water turns into a gas and rises.
Water must evaporate out of the salt water, leaving the salt behind.

Condensation:  When water vapor turns into liquid water.
The water vapor must condense to form liquid fresh water.

Precipitation: Water falling in any form.
The condensed water must fall (into a new container hopefully).  The collected precipitation should be your fresh water.

Check out these contraptions:


I think I would want these kids with me on a deserted island!


We also used our knowledge of the water cycle to make  a cloud.
The water cycle


First we evaporated hot water.


Then we put dust in for water to stick to.


Then we cooled the water by putting ice on top.  This caused condensation onto the dust particles and the bottom of the cup.

Then we watched the cloud form in the jar.  The cup and jar began to precipitate!


Of course we had to let the cloud loose and enjoyed watching it rise out of the jar.


Check out another way to make a cloud.  This time I used rubbing alcohol and air pressure changes to create a cloud.
Think about why it works.


This cloud is made by changing the pressure!  When you change pressure you change the temperature.  High pressure- higher temperature.  When I untwist the bottle, I lower the temperature and cause the water to condense on the rubbing alcohol fumes. With a parent, see if you can get the same result!

 (Blue food coloring is in the alcohol so you can see it better.)

This is a great silly science song about the water cycle


Friday, April 19, 2013

Electromagnetism


Electricity and Magnetism have quite a bit in common.  Opposites attracting, likes repelling.  Both have an area around them called a field.  Up until Hans Christian Oersted, these two forces were thought to be similar, but separate.

On April 28, 1820 Hans Christian Oersted made an amazing discovery as he was giving a class lecture (if I could be so lucky!)  He happened to have a compass on the demonstration table he was using for his circuit demonstration.  When he closed the switch, the compass needle moved!  

Electricity produced a magnetic field! Whoa!

Check out the picture from How Stuff Works.
This was the birth of the electromagnet.  Or a magnet you can turn off and on  (I like to picture a big crane lifting cars.)

We build an electromagnet in the lab today and discovered ways to make it stronger.


After experimenting with different variables we found two ways to make it stronger.


There are electromagnets in all kinds of devices, you ipod, buzzers, bells, microphones, even toasters!  Below is an image from Wikimedia.

This bell works using an electromagnet.  The current flows around the upside down u shaped piece of metal.  This makes the u into a magnet.  The u attracts the metal below causing the ball to hit the bell.  When this happens, the circuit is broken and the U is no longer magnetic.  The ball falls.  The circuit is connected again and the whole processes starts again.


The amazing part is that a magnet can also produce electricity!  Double Whoa!


This is how we get electricity today!  

By moving wires or magnets next to each other, a current is produced.  You can use a variety of ways to turn the wire or magnets (wind, water, steam produced by burning fossil fuels.)

Check out this coal generator process from Footprints Science.

Or even build you own!

Monday, April 15, 2013

Congratulations Science Bee Winners!


Twenty-nine  Park Village students made it to the final round of the Science Bee.  Today, they competed for the title Science Bee Champion.  In a little over an hour, students answered 130 questions ranging from "What is the pH of a neutral solution?", to "What are two ways to make an electromagnet stronger?" (Answers are 7, and for the later,  more coils or more voltage.)  

With sweaty hands and anxious expressions students answered question after question showing off their impressive banks of knowledge.  After today, I am convinced that very few people are smarter than these 5th graders!

These students competed because they love science.  There was no grade attached, or required hours to study (many put tens of hours into it.)  I am convinced more than ever, that students naturally love to learn and especially like to have a reason to do so.

The winning question was:  What is a substance that speeds up a reaction called?

Answer: Catalyst


It was on the tip of your tongue, right?


Students learned about this in one of their previous chemical reaction labs entitled "Elephant Toothpaste" .  Yeast (catalyst) sped up the reaction of hydrogen peroxide to water so quickly that the oxygen bubbles spilled out of the bottle looking like giant toothpaste!

Congratulations to all students who put forth the effort to learn about science, not because it was part of their grade, but because they wanted to.


Saturday, April 13, 2013

Conductors and Insulators

Today 4th graders explored which materials allow electricity to travel through them.

Conductors are substances that allow electricity to flow through easily.

Insulators are substances that don't allow electricity to flow through them.

Students built a conductivity tester out of an open circuit, bulb and two batteries.  They replaced the opening with the object to be tested.    If the object conducts electricity, the bulb lights up.  If the object is an insulator, the bulb does not.
The metal spoon is a conductor and lights the bulb.
The comb is an insulator and doesn't light the bulb.


We also learned about switches using air as an insulator to prevent electricity from flowing.  When the switch is open, electricity can't pass through the air, so the light turns off.


We found that shiny, metallic looking items often conducted electricity (like pyrite, metallic stickers, paper clips, and pennies.) Items made out of rubber, wood, plastic, cloth or painted were insulators (water bottle lid, plastic spoon, popsicle stick.)


We are actually conductors too (this is why we can get electrocuted!)  We used a conductivity tester (with low voltage- of course) and made a circuit with our finger tips with the whole class as conductors.

Some objects allow electricity to flow through, but resist the flow.  These are called resistors.  Think of trying to swim quickly through a thick ketchup (you are the electrons, and the resistor is the ketchup.) 


This causes friction which creates heat (try rubbing your hands together quickly to and see how hot they get or just remember the rug burn you got playing crab soccer.)  If enough heat is created, it produces light.  Old light bulbs work this way.  They use a filament that resists the flow of electricity (that is why they get so hot!)  We made our own light bulb today out of nichrom wire (a nice resistor.) 


You can also find resistors in heaters, electric ovens, and toasters (spotted by finding glowing red coils.)

Try this virtual circuit tester from the BBC.
virtual circuit tester

Tuesday, April 2, 2013

Moon Lab

Third graders were "Over the Moon" with excitement as we explored why the moon looks like it does!


We found out that the moon acts like a mirror and reflects the sun.  If the moon gave off its own light, it would always look like a full moon (which would make the wolves very happy!)  We looked at a glow in the dark basketball and saw that it always looked like a full moon.  We also tested a styrofoam ball (which did not give off its own light) and we were able to see all the phases of the moon!

When the moon appears to be getting bigger, the right side is lit and it is called


When the moon appears to be getting smaller, the left side is lit and it is called


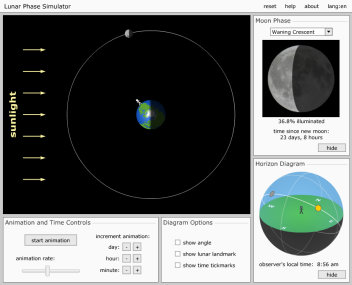
Check out how the moon appears to be changing shape created by the Nebraska Astronomy Applet Project.  Click on + days to see how the moon appears as it goes through its cycle of about 29 days.
Lunar Phases Simulator (NAAP)


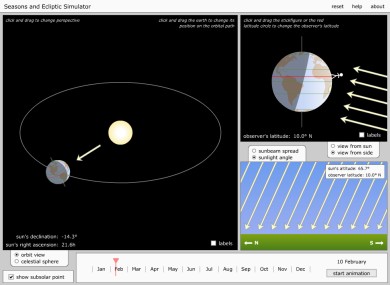
We also explored why we have seasons.  It is all because of the earth's tilt! Check out this simulation from Nebraska Astronomy Applet Project!


Seasons Simulator (NAAP)


Try this at home to see the moon phases.

Use a pencil, a styrofoam ball (you can use a different white ball, but you will need to figure out how to attach it to the pencil), and a lamp.  

Attach the ball to the pencil and put the lamp outside the door of a darkened room (I used a bathroom that had no windows and the hall light.) Hold the ball a bit over your head in front of you. 

 Keeping the ball directly in front of you, slowly turn around.  Watch as the shadow changes and a different part of the ball is "lit" up with reflected light.  

When you look out of your room, the ball is dark.  It becomes fully lit when your back is to the doorway (be sure to howl with delight when you see this!)


Monday, April 1, 2013

Sea and Land Breezes

5th Graders found wind to be "easy breezy" today!

Winds are caused by uneven heating of the earth.


Uneven heating of the earth causes wind.

A Sea Breeze is created when the sun heats up the land more quickly than the ocean.  We have all experienced that the sand can be much warmer than the ocean on a hot day.  Ouch!

 When the land heats up, the air above the land air rises.  This makes space for the cool ocean air to rush in and take its place.  That is why the breeze blows towards you at the beach on a warm day.
Sea Breeze

The water still heats up, just not as quickly as the land.

A Land Breeze is created when the sun goes down.  At night, the land cools off quickly (the sand is cold) and the ocean hangs onto the heat it gathered during the day. 

The air above the ocean is warmer.  It rises and the cool air from the land rushes towards the ocean to take its place.  The breeze blows from the land to the ocean, the opposite direction!
Land Breeze
Today we learned about thermometers and experimented by putting sand and water in hot and cold zones.  We took the temperature after 20 minutes and saw that land heated up faster than water, but didn't hold its heat for long!  Water, on the other hand stayed closer to its original temperature.
The hot zone!


We learned to read thermometers measuring like scientists using Celsius!


You can even make your own thermometer!  Remembering that when something gets hot it expands, you can try this experiment from Energy Quest.


Don't forget to study!  Science Bee Qualifying Round is next week.  The top 5 from each class compete in the finals on April 15th after band.